<?xml version="1.0" encoding="utf-8"?><feed xmlns="http://www.w3.org/2005/Atom" xml:lang="en-AU"><generator uri="https://jekyllrb.com/" version="4.4.1">Jekyll</generator><link href="https://docs.autechnet.com/feed.xml" rel="self" type="application/atom+xml" /><link href="https://docs.autechnet.com/" rel="alternate" type="text/html" hreflang="en-AU" /><updated>2026-08-01T17:56:43+10:00</updated><id>https://docs.autechnet.com/feed.xml</id><title type="html">AuTechNet</title><subtitle>How-tos and technical notes — Linux, networking, Synology, Windows and general sysadmin write-ups.</subtitle><entry><title type="html">How to Setup playSMS on the Raspberry Pi</title><link href="https://docs.autechnet.com/2022/06/02/how-to-setup-playsms-on-the-raspberry-pi/" rel="alternate" type="text/html" title="How to Setup playSMS on the Raspberry Pi" /><published>2022-06-02T21:34:02+10:00</published><updated>2022-06-02T21:34:02+10:00</updated><id>https://docs.autechnet.com/2022/06/02/how-to-setup-playsms-on-the-raspberry-pi</id><content type="html" xml:base="https://docs.autechnet.com/2022/06/02/how-to-setup-playsms-on-the-raspberry-pi/"><![CDATA[<div class="post-thumb"><img alt="" class="attachment-post-thumbnail size-post-thumbnail wp-post-image" height="1440" src="/assets/uploads/2022/06/220602AM_playSMS.jpg" width="2560"/></div><br/>
<p>In this guide, I’ll provide some of the information you’ll need in getting playSMS installed on a Ubuntu/Debian based distribution. In this case we’re setting this up on a Raspberry Pi. </p>
<figure class="wp-block-embed is-type-video is-provider-youtube wp-block-embed-youtube wp-embed-aspect-16-9 wp-has-aspect-ratio"><div class="wp-block-embed__wrapper">
<iframe allow="accelerometer; autoplay; clipboard-write; encrypted-media; gyroscope; picture-in-picture; web-share" allowfullscreen="" frameborder="0" height="281" referrerpolicy="strict-origin-when-cross-origin" src="https://www.youtube.com/embed/lbbYdYIx2aU?feature=oembed" title="How to setup PlaySMS on the Raspberry Pi" width="500"></iframe>
</div></figure>
<p>I recommend you watch the video for a better understanding of the command you’re running before just pasting this content without even thinking about it. </p>
<p>Run the below commands as the<strong> pi or default admin</strong> user you have on your Ubuntu system.  </p>
<pre class="wp-block-code"><code>sudo curl -sSL https://packages.sury.org/php/README.txt | sudo bash -x       
sudo dmesg | grep ttyUSB
sudo apt-get install build-essential libusb-1.0-0 libusb-1.0-doc mc unzip mariadb-server apache2 usb-modeswitch php7.4 php7.4-cli php7.4-mysql php7.4-gd php7.4-curl php7.4-mbstring php7.4-xml php7.4-zip smstools software-properties-common apt-transport-https
sudo apt-get install ufw
sudo ufw allow ssh
sudo ufw allow http
sudo ufw allow https
sudo ufw enable
sudo ufw status
sudo systemctl start mariadb.service
sudo systemctl enable  mariadb.service
sudo systemctl start apache2.service
sudo systemctl enable apache2.service
sudo adduser komodo
sudo usermod -a -G sudo komodo 
sudo usermod -a -G www-data komodo
sudo usermod -a -G smsd komodo 
dpkg-reconfigure tzdata 
sudo dpkg-reconfigure tzdata  # Configure your Timezone with this command. 
sudo nano /etc/php/7.4/cli/php.ini  # Update the datetime variable to your timezone. </code></pre>
<p><strong>Run these commands as the “Komodo” user. </strong>Use the video and attachments in this article for the necessary configuration files. </p>
<pre class="wp-block-code"><code>cd ~/ls
mkdir public_html log
sudo chmod 775 /home/komodo/ public_html/ log/ -R
sudo chown komodo.komodo -R /home/komodo
sudo chown www-data.komodo -R /home/komodo/log
ls -l /home/komodo
sudo nano  /etc/apache2/sites-available/sms.domain.org.conf
# Paste in the Apache Virtual Host Configuration now from the attached link in this article.
cd /etc/apache2/sites-available/
sudo a2dissite 000-default.conf 
sudo a2ensite sms.domain.org.conf 
sudo systemctl reload apach2
sudo systemctl reload apache2.service 
cd /home/komodo/public_html/
nano test.php   # Paste in some PHP Code into this file and then load up the Apache server in your web browser - Check the content renders. 
rm test.php 
cd ..
mkdir -p bin etc lib src
sudo chmod 775 bin etc lib src
cd /home/komodo
sudo touch log/audit.log log/playsms.log
sudo chmod 664 log/audit.log log/playsms.log
sudo chown www-data.komodo -R log ls -l log
sudo chown www-data:komodo -R log
ls -l log/
sudo mysqladmin create playsms
sudo mysql

# Run the attahced SQL Commands as listed in this guide. 

cd src/
sudo apt-get install git
git clone -b 1.4.5 https://github.com/antonraharja/playSMS
ls
playSMS/
ls
install.conf.dist install.conf.dist.bak
sudo mv install.conf.dist install.conf
sudo nano install.conf   # Update your install.conf according the playSMS directories - Refer to the video for help here. 
./install-playsms.sh 
ls
cd ../../etc/
ls
playsmsd.conf ../bin/
cd ..
ls
cd bin/
ls
./playsmsd playsmsd.conf status
./playsmsd playsmsd.conf stop
./playsmsd playsmsd.conf status
sudo nano /etc/systemd/system/playsms.service    # Refer to the attached configuration for this service. 
sudo systemctl daemon-reload
sudo systemctl enable playsms
sudo systemctl restart playsms
sudo service playsms enable
sudo service playsms status
./playsmsd status
cd public_html/
nano config.php  # Update the configuraiton according to your installation. (HTTPS / Log Level)
cd ..
sudo cp /etc/smsd.conf /etc/smsd.conf.bak
sudo service smstools stop
sudo rm /etc/smsd.conf
sudo nano /etc/smsd.conf     # Update with the attached configuration. 
cd /var/spool/
cd  sms/
mkdir gsm1
ls -lthra
sudo chown smsd:smsd gsm1/ -R
sudo service smstools start
tail /var/log/smstools/smsd.log
sudo chmod 777 /var/spool/sms/ -R
sudo chown www-data:smsd /var/spool/sms/ -R
ls -lthra

# Follow the video and use this example installation code accordingly. </code></pre>
<h2 class="wp-block-heading">Apache Virtual Hosts File</h2>
<pre class="wp-block-code"><code>&lt;VirtualHost *:80&gt;
    ServerName sms.domain.org
    DocumentRoot /home/komodo/public_html
    ErrorLog /home/komodo/log/httpd-error.log
    CustomLog /home/komodo/log/httpd-accesss.log combined
    &lt;Directory /home/komodo/public_html&gt;
        AllowOverride FileInfo AuthConfig Limit Indexes
        Options MultiViews Indexes SymLinksIfOwnerMatch IncludesNoExec
        Require method GET POST OPTIONS
        php_admin_value engine On
    &lt;/Directory&gt;
&lt;/VirtualHost&gt;</code></pre>
<h2 class="wp-block-heading">PlaySMS Daemon Service</h2>
<pre class="wp-block-code"><code>[Unit]
Description=PlaySMS
After=mariadb.service
[Service]
Type=oneshot
RemainAfterExit=yes
ExecStart=/home/komodo/bin/playsmsd /home/komodo/bin/playsmsd.conf start
ExecStop=/home/komodo/bin/playsmsd /home/komodo/bin/playsmsd.conf stop
[Install]
WantedBy=multi-user.target</code></pre>
<h2 class="wp-block-heading">/etc/smsd.conf example configuration for a USB Modem</h2>
<pre class="wp-block-code"><code># Global configuration
devices = gsm1
#devices = gsm1, gsm2

loglevel = 7

# logfiles
stats = /var/log/smstools/smsd_stats
logfile = /var/log/smstools/smsd.log

# Default queue directory = /var/spool/sms
outgoing = /var/spool/sms/outgoing
checked = /var/spool/sms/checked
failed = /var/spool/sms/failed
incoming = /var/spool/sms/incoming
sent = /var/spool/sms/sent

# do not set report folder, let status report files saved in incoming
#report = /var/spool/sms/report

delaytime = 2
errorsleeptime = 10
blocktime = 180
autosplit = 3
#receive_before_send = yes

# Queue configurations

[queues]
gsm1 = /var/spool/sms/gsm1
#gsm2 = /var/spool/sms/gsm2
#modem2 = /var/spool/sms/modem2

# Modem configurations

# Modem name: modem1
# Modem type: Wavecom USB
[gsm1]
#init = AT+CNMI=2,2,0,1,0;+CMEE=1
memory_start = 0
device = /dev/ttyUSB0
baudrate = 115200
incoming = yes
report = yes
queues = gsm1

#[gsm2]
#memory_start=0
#device = /dev/ttyUSBx
#baudrate = 115200
#incoming = yes
#report = yes
#queues = gsm2

[default]
queues = gsm1</code></pre>]]></content><author><name></name></author><category term="General" /><summary type="html"><![CDATA[In this guide, I’ll provide some of the information you’ll need in getting playSMS installed on a Ubuntu/Debian based distribution. In this case we’re setting this up on a Raspberry Pi. I recommend you watch the video for a better understanding of the command you’re running before just pasting this content without even thinking about it. Run the below commands as the pi or default admin user you have on your Ubuntu system. sudo curl -sSL https://packages.sury.org/php/README.txt | sudo bash -x sudo dmesg | grep ttyUSB sudo apt-get install build-essential libusb-1.0-0 libusb-1.0-doc mc unzip mariadb-server apache2 usb-modeswitch php7.4 php7.4-cli php7.4-mysql php7.4-gd php7.4-curl php7.4-mbstring php7.4-xml php7.4-zip smstools software-properties-common apt-transport-https sudo apt-get install ufw sudo ufw allow ssh sudo ufw allow http sudo ufw allow https sudo ufw enable sudo ufw status sudo systemctl start mariadb.service sudo systemctl enable mariadb.service sudo systemctl start apache2.service sudo systemctl enable apache2.service sudo adduser komodo sudo usermod -a -G sudo komodo sudo usermod -a -G www-data komodo sudo usermod -a -G smsd komodo dpkg-reconfigure tzdata sudo dpkg-reconfigure tzdata # Configure your Timezone with this command. sudo nano /etc/php/7.4/cli/php.ini # Update the datetime variable to your timezone. Run these commands as the “Komodo” user. Use the video and attachments in this article for the necessary configuration files. cd ~/ls mkdir public_html log sudo chmod 775 /home/komodo/ public_html/ log/ -R sudo chown komodo.komodo -R /home/komodo sudo chown www-data.komodo -R /home/komodo/log ls -l /home/komodo sudo nano /etc/apache2/sites-available/sms.domain.org.conf # Paste in the Apache Virtual Host Configuration now from the attached link in this article. cd /etc/apache2/sites-available/ sudo a2dissite 000-default.conf sudo a2ensite sms.domain.org.conf sudo systemctl reload apach2 sudo systemctl reload apache2.service cd /home/komodo/public_html/ nano test.php # Paste in some PHP Code into this file and then load up the Apache server in your web browser - Check the content renders. rm test.php cd .. mkdir -p bin etc lib src sudo chmod 775 bin etc lib src cd /home/komodo sudo touch log/audit.log log/playsms.log sudo chmod 664 log/audit.log log/playsms.log sudo chown www-data.komodo -R log ls -l log sudo chown www-data:komodo -R log ls -l log/ sudo mysqladmin create playsms sudo mysql]]></summary></entry><entry><title type="html">Configuring NUT UPS Monitor on TrueNas and Debian</title><link href="https://docs.autechnet.com/2021/07/11/configuring-nut-ups-monitor-on-truenas-and-debian/" rel="alternate" type="text/html" title="Configuring NUT UPS Monitor on TrueNas and Debian" /><published>2021-07-11T14:35:59+10:00</published><updated>2021-07-11T14:35:59+10:00</updated><id>https://docs.autechnet.com/2021/07/11/configuring-nut-ups-monitor-on-truenas-and-debian</id><content type="html" xml:base="https://docs.autechnet.com/2021/07/11/configuring-nut-ups-monitor-on-truenas-and-debian/"><![CDATA[<p>So, I recently had a UPS I was setting up that had USB monitoring. I had planned on connecting this to the TrueNAS system I have running. This setup was rather simple using the UPS service that’s built into TrueNAS. The UPS I had was an APC Tower UPS 1500VA – It took a few attempts to find the right driver, but one of the 1500VA drivers worked for my particular UPS –  Usually, it’s a <strong>usbhid-ups</strong> driver.</p>
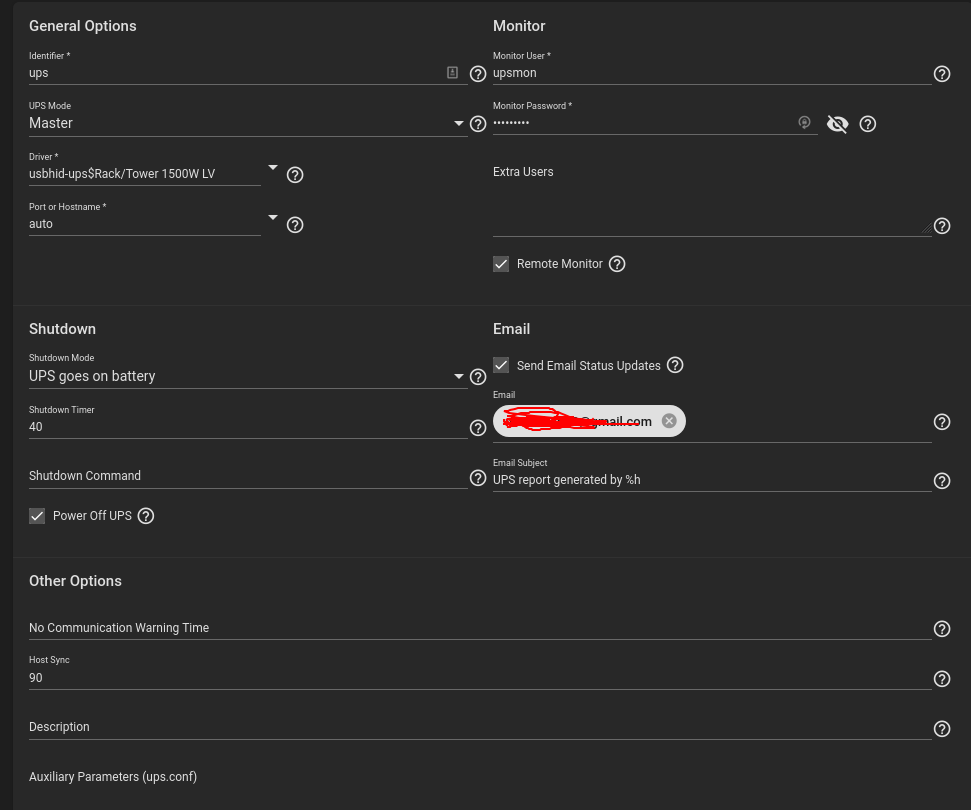
<p>After configuring the service with the below settings I moved onto configuring a network client to monitor the TrueNAS UPS through the network.  </p>
<figure class="wp-block-image size-large is-resized"><img alt="" class="wp-image-237" data-recalc-dims="1" height="700" src="/assets/uploads/2021/07/image.png" width="840"/></figure>
<figure class="wp-block-image size-large"><img alt="" class="wp-image-238" data-recalc-dims="1" height="157" src="/assets/uploads/2021/07/image-1.png" width="955"/></figure>
<p>The UPS I have setup has a power borad connected to it that then powers several smaller PCs – All well within the UPS ratings – So, rest assured I wont blow any fuses. </p>
<p>I found it was important to specify the LISTEN addresses for Auxlary Paramters upsd.conf section. Here I’ve configured my NAS’s IP and Localhost address.</p>
<h2 class="wp-block-heading">Debian / Ubuntu / General NUT UPS Configuration</h2>
<p>So, once you’ve got the nut-client installed with </p>
<pre class="wp-block-code"><code>sudo apt install nut-client</code></pre>
<p>It’s a matter of configuring the service and configuration files. </p>
<p>So, firstly run the following commands on nut-monitor and nut-client as demonstrated in this article with <a href="https://askubuntu.com/questions/804946/systemctl-how-to-unmask" rel="noreferrer noopener" target="_blank">x11 as an example</a>. </p>
<figure class="wp-block-image size-large"><img alt="" class="wp-image-239" data-recalc-dims="1" height="40" src="/assets/uploads/2021/07/image-2.png" width="620"/></figure>
<p>Now, remember, only run the following commands in the Ask Ubuntu post as linked if it returns symbolic link to /dev/null. If not, move on. </p>
<p>Once the service is now no-longer /dev/null we can configure the settings files. </p>
<p><code> nano /etc/nut/upsmon.conf</code></p>
<p>In upsmon.conf find the lines like below:</p>
<p># <code>MONITOR myups@bigserver 1 monmaster blah master </code><br/><code># MONITOR su700@server.example.com 1 upsmon secretpass slave </code><br/><code># MONITOR myups@localhost 1 upsmon pass master (or slave)</code></p>
<p>Add the following line directly below it </p>
<p><strong><em>MONITOR ups@172.16.1.250 1 upsmon fixmepass slave</em></strong></p>
<p>Note – Change the IP Address to your TrueNAS IP address – the upsmon is the username and fixmepass is of course the password. </p>
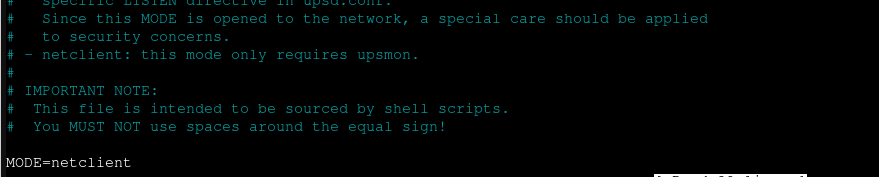
<p>Next, save that file and edit: /etc/nut/nut.conf</p>
<p>Change the <strong>MODE</strong> line to <strong>MODE=netclient</strong></p>
<figure class="wp-block-image size-large"><img alt="" class="wp-image-240" data-recalc-dims="1" height="177" loading="lazy" src="/assets/uploads/2021/07/image-3.png" width="879"/></figure>
<p>Finally, start the nut-client service with </p>
<p><strong>sudo service nut-client start</strong></p>
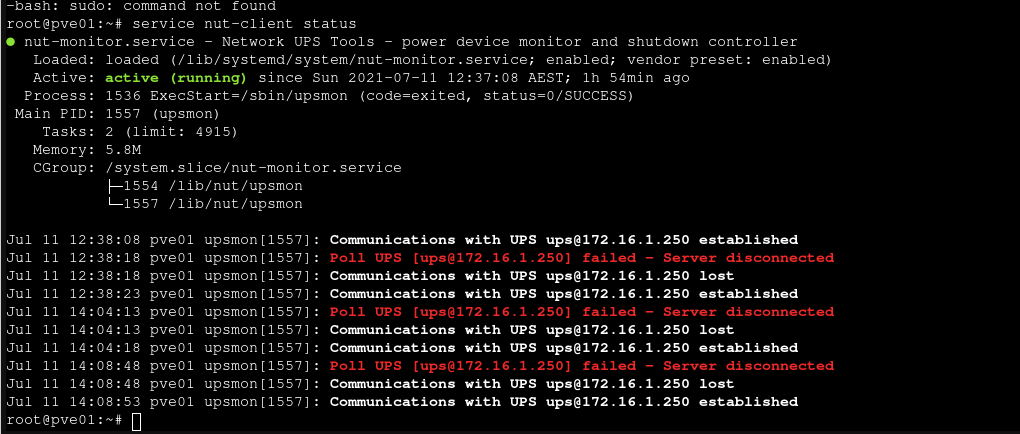
<p>You can check the service is running with <strong>sudo service nut-client status</strong></p>
<figure class="wp-block-image size-large"><img alt="" class="wp-image-241" data-recalc-dims="1" height="434" loading="lazy" src="/assets/uploads/2021/07/image-4.png" width="1020"/></figure>
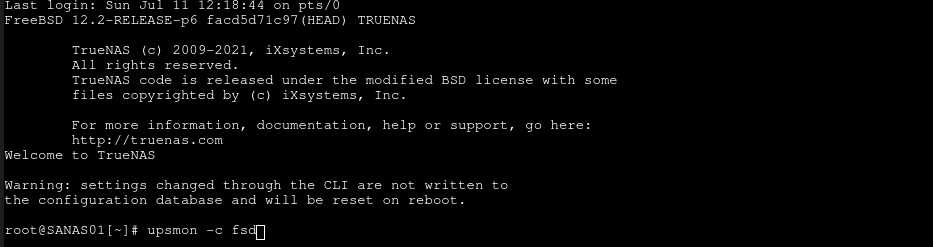
<p> Finally, test the service by running on the MASTER (The TrueNAS) <strong>upsmon -c fsd </strong>from console.</p>
<p><strong>Note –</strong> this will shutdown your NAS and all other clients you have configured to monitor the UPS Master – Your TrueNAS.  </p>
<figure class="wp-block-image size-large"><img alt="" class="wp-image-242" data-recalc-dims="1" height="247" loading="lazy" src="/assets/uploads/2021/07/image-5.png" width="933"/></figure>]]></content><author><name></name></author><category term="General" /><summary type="html"><![CDATA[So, I recently had a UPS I was setting up that had USB monitoring. I had planned on connecting this to the TrueNAS system I have running. This setup was rather simple using the UPS service that’s built into TrueNAS. The UPS I had was an APC Tower UPS 1500VA – It took a few attempts to find the right driver, but one of the 1500VA drivers worked for my particular UPS – Usually, it’s a usbhid-ups driver. After configuring the service with the below settings I moved onto configuring a network client to monitor the TrueNAS UPS through the network. The UPS I have setup has a power borad connected to it that then powers several smaller PCs – All well within the UPS ratings – So, rest assured I wont blow any fuses. I found it was important to specify the LISTEN addresses for Auxlary Paramters upsd.conf section. Here I’ve configured my NAS’s IP and Localhost address. Debian / Ubuntu / General NUT UPS Configuration So, once you’ve got the nut-client installed with sudo apt install nut-client It’s a matter of configuring the service and configuration files. So, firstly run the following commands on nut-monitor and nut-client as demonstrated in this article with x11 as an example. Now, remember, only run the following commands in the Ask Ubuntu post as linked if it returns symbolic link to /dev/null. If not, move on. Once the service is now no-longer /dev/null we can configure the settings files. nano /etc/nut/upsmon.conf In upsmon.conf find the lines like below: # MONITOR myups@bigserver 1 monmaster blah master # MONITOR su700@server.example.com 1 upsmon secretpass slave # MONITOR myups@localhost 1 upsmon pass master (or slave) Add the following line directly below it MONITOR ups@172.16.1.250 1 upsmon fixmepass slave Note – Change the IP Address to your TrueNAS IP address – the upsmon is the username and fixmepass is of course the password. Next, save that file and edit: /etc/nut/nut.conf Change the MODE line to MODE=netclient Finally, start the nut-client service with sudo service nut-client start You can check the service is running with sudo service nut-client status Finally, test the service by running on the MASTER (The TrueNAS) upsmon -c fsd from console. Note – this will shutdown your NAS and all other clients you have configured to monitor the UPS Master – Your TrueNAS.]]></summary></entry><entry><title type="html">Unifi and UNMS on the one Computer</title><link href="https://docs.autechnet.com/2020/10/20/unifi-and-unms-on-the-one-machine/" rel="alternate" type="text/html" title="Unifi and UNMS on the one Computer" /><published>2020-10-20T16:08:57+10:00</published><updated>2020-10-20T16:08:57+10:00</updated><id>https://docs.autechnet.com/2020/10/20/unifi-and-unms-on-the-one-machine</id><content type="html" xml:base="https://docs.autechnet.com/2020/10/20/unifi-and-unms-on-the-one-machine/"><![CDATA[<div class="post-thumb"><img alt="" class="attachment-post-thumbnail size-post-thumbnail wp-post-image" height="164" src="/assets/uploads/2020/10/unifi.jpeg" width="307"/></div><br/>
<p>So, I’ve got a Debian NAS that had some spare resources – So, I thought I would migrate over my Unifi and UNMS systems. </p>
<p>The OS I used for this setup was Debian 10 –  With no additionall repositries – Just Samba, DNSMASQ for TFTP and Apache. </p>
<p>To do this I simply followed the installation script here: </p>
<p> UniFi Installation Scripts – <a href="https://community.ui.com/questions/UniFi-Installation-Scripts-or-UniFi-Easy-Update-Script-or-UniFi-Lets-Encrypt-or-Ubuntu-16-04-18-04-/ccbc7530-dd61-40a7-82ec-22b17f027776" rel="noreferrer noopener" target="_blank">community.ui.com</a>.</p>
<p>After this I installed UNMS and changed the ports to ports that were out of the range of my existing services (Apache) and did the following: </p>
<pre class="wp-block-code"><code>curl -fsSL https://unms.com/v1/install &gt; /tmp/unms_inst.sh &amp;&amp; sudo bash /tmp/unms_inst.sh --http-port 9080 --https-port 9443</code></pre>
<p>After both commands both Unifi and UNMS were ableto be setup – Pain free. </p>
<p>After a reboot both services resumed and functioned as normal – After which I imported my UNMS system from the UNMSApp. </p>
<figure class="wp-block-image size-large"><img alt="" class="wp-image-221" data-recalc-dims="1" height="164" src="/assets/uploads/2020/10/unifi.jpeg" width="307"/></figure>]]></content><author><name></name></author><category term="General" /><summary type="html"><![CDATA[So, I’ve got a Debian NAS that had some spare resources – So, I thought I would migrate over my Unifi and UNMS systems. The OS I used for this setup was Debian 10 – With no additionall repositries – Just Samba, DNSMASQ for TFTP and Apache. To do this I simply followed the installation script here: UniFi Installation Scripts – community.ui.com. After this I installed UNMS and changed the ports to ports that were out of the range of my existing services (Apache) and did the following: curl -fsSL https://unms.com/v1/install &gt; /tmp/unms_inst.sh &amp;&amp; sudo bash /tmp/unms_inst.sh --http-port 9080 --https-port 9443 After both commands both Unifi and UNMS were ableto be setup – Pain free. After a reboot both services resumed and functioned as normal – After which I imported my UNMS system from the UNMSApp.]]></summary></entry><entry><title type="html">Crontab for Backup Job Scheduling</title><link href="https://docs.autechnet.com/2020/10/18/crontab-for-backup-job-scheduling/" rel="alternate" type="text/html" title="Crontab for Backup Job Scheduling" /><published>2020-10-18T21:37:27+10:00</published><updated>2020-10-18T21:37:27+10:00</updated><id>https://docs.autechnet.com/2020/10/18/crontab-for-backup-job-scheduling</id><content type="html" xml:base="https://docs.autechnet.com/2020/10/18/crontab-for-backup-job-scheduling/"><![CDATA[<div class="post-thumb"><img alt="" class="attachment-post-thumbnail size-post-thumbnail wp-post-image" height="282" src="/assets/uploads/2020/10/Crontab_Logs.png" width="972"/></div><br/>
<p>Recently I utilized a crontab to run a weekly backup job. </p>
<p>This job, ran as a standard crontab user. </p>
<pre class="wp-block-code"><code>0 1 * * 0 /home/localadmin/BackupTask-Dest-Elements.ssh</code></pre>
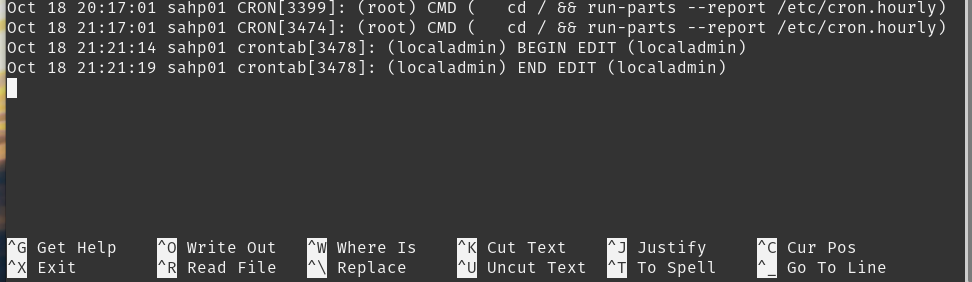
<p>The above backup job can be checked through /var/log/cron.log.</p>
<figure class="wp-block-image size-large"><img alt="" class="wp-image-217" data-recalc-dims="1" height="282" src="/assets/uploads/2020/10/Crontab_Logs.png" width="972"/></figure>
<h2 class="wp-block-heading">Tip – Enable Cron Logging in Debian</h2>
<p>Enable Crontab logging to track when jobs and changes to crontab have been made. </p>
<p>The location of the cron log entries can be changed. This means you will have to edit the <strong>/etc/rsyslog.conf</strong> file.</p>
<pre class="wp-block-preformatted">vi /etc/rsyslog.conf</pre>
<p>In the file, you will find the following line:</p>
<pre class="wp-block-preformatted">#cron.*                     -/var/log/cron</pre>
<p>Uncomment the line (remove the #) and save the rsyslog..conf file.<br/>Next you will have to restart the rsyslog daemon:</p>
<pre class="wp-block-preformatted">service rsyslog restart</pre>
<p>After restarting the rsyslog daemon, crontab log entries will appear in the <strong>/var/log/cron.log</strong> file. </p>
<p>Source: <a href="https://www.kinamo.be/en/support/faq/how-to-activate-cron-log-on-debian" rel="noreferrer noopener" target="_blank">kinamo.be</a></p>]]></content><author><name></name></author><category term="General" /><summary type="html"><![CDATA[Recently I utilized a crontab to run a weekly backup job. This job, ran as a standard crontab user. 0 1 * * 0 /home/localadmin/BackupTask-Dest-Elements.ssh The above backup job can be checked through /var/log/cron.log. Tip – Enable Cron Logging in Debian Enable Crontab logging to track when jobs and changes to crontab have been made. The location of the cron log entries can be changed. This means you will have to edit the /etc/rsyslog.conf file. vi /etc/rsyslog.conf In the file, you will find the following line: #cron.*                     -/var/log/cron Uncomment the line (remove the #) and save the rsyslog..conf file.Next you will have to restart the rsyslog daemon: service rsyslog restart After restarting the rsyslog daemon, crontab log entries will appear in the /var/log/cron.log file.  Source: kinamo.be]]></summary></entry><entry><title type="html">Finding Drive Information in the Linux Terminal</title><link href="https://docs.autechnet.com/2020/10/18/finding-drive-information-in-the-linux-terminal/" rel="alternate" type="text/html" title="Finding Drive Information in the Linux Terminal" /><published>2020-10-18T07:06:04+10:00</published><updated>2020-10-18T07:06:04+10:00</updated><id>https://docs.autechnet.com/2020/10/18/finding-drive-information-in-the-linux-terminal</id><content type="html" xml:base="https://docs.autechnet.com/2020/10/18/finding-drive-information-in-the-linux-terminal/"><![CDATA[<div class="post-thumb"><img alt="" class="attachment-post-thumbnail size-post-thumbnail wp-post-image" height="334" src="/assets/uploads/2020/10/ntfs-3g-fstab.png" width="1023"/></div><br/>
<p>Two commands come in useful when updating /etc/fstab to mount your partitions to your preferred locations. Recently though, I needed to map some drives on a non-gui machine so I didn’t have my-usual lifeline of a simple GUI disk manager.  </p>
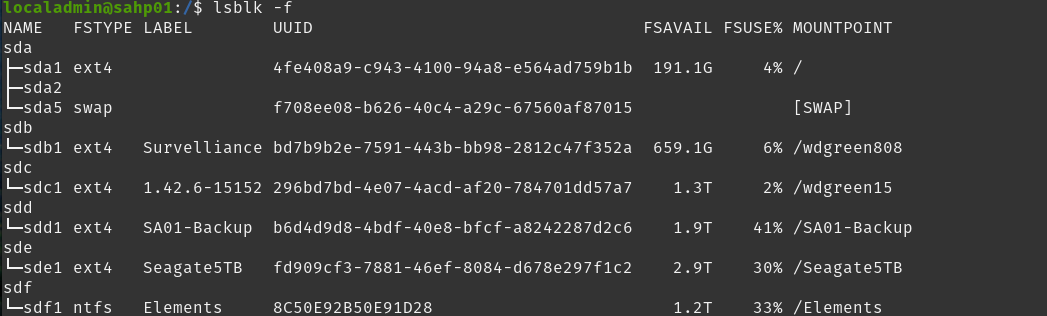
<p>So, I found myself resorting to “lsblk -f” to show all drives and their UUID. </p>
<figure class="wp-block-image size-large"><img alt="" class="wp-image-212" data-recalc-dims="1" height="309" src="/assets/uploads/2020/10/lsblk_f.png" width="1024"/><figcaption>The lsblk command in Linux listing all drives connected and respective UUIDs</figcaption></figure>
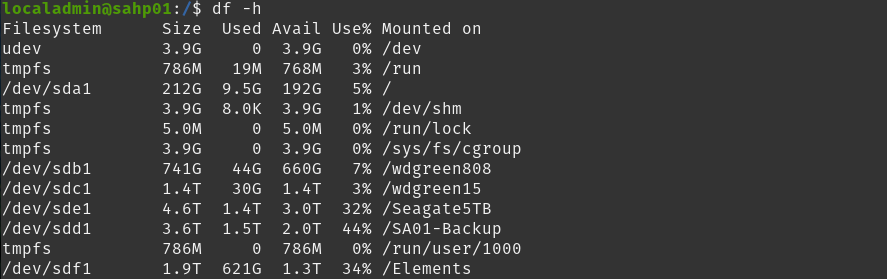
<p>I also utilise the “df -h” command to see disks mounted, space available and mounted locations. </p>
<figure class="wp-block-image size-large"><img alt="" class="wp-image-213" data-recalc-dims="1" height="279" src="/assets/uploads/2020/10/df_H.png" width="887"/></figure>
<p>An email of how I configured /etc/fstab is also below as for one of my drives it was an NTFS partition. Here’s how I sorted it on Debian. </p>
<p>Install ntfs-3g with “<strong>sudo apt-get install ntfs-3g</strong>” – As I found this package didn’t come with Debian 10. After you’ve determine the drive with df or lsblk – Create the directory where you would like to mount the drive. </p>
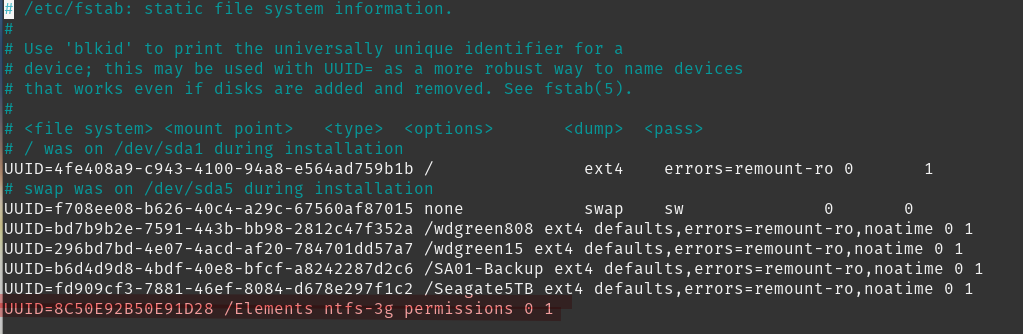
<p>Finally, the /etc/fstab will need the line as per below – with your UUID of course. </p>
<figure class="wp-block-image size-large"><img alt="" class="wp-image-214" data-recalc-dims="1" height="334" loading="lazy" src="/assets/uploads/2020/10/ntfs-3g-fstab.png" width="1023"/><figcaption>/etc/fstab example – With an NTFS Filesystem. </figcaption></figure>
<figure class="wp-block-embed-youtube wp-block-embed is-type-video is-provider-youtube wp-embed-aspect-16-9 wp-has-aspect-ratio"><div class="wp-block-embed__wrapper">
<iframe allow="accelerometer; autoplay; clipboard-write; encrypted-media; gyroscope; picture-in-picture; web-share" allowfullscreen="" frameborder="0" height="281" loading="lazy" referrerpolicy="strict-origin-when-cross-origin" src="https://www.youtube.com/embed/0CxNICvQC4Y?feature=oembed" title="Finding Disk and Folder information in Debian" width="500"></iframe>
</div></figure>]]></content><author><name></name></author><category term="General" /><summary type="html"><![CDATA[Two commands come in useful when updating /etc/fstab to mount your partitions to your preferred locations. Recently though, I needed to map some drives on a non-gui machine so I didn’t have my-usual lifeline of a simple GUI disk manager. So, I found myself resorting to “lsblk -f” to show all drives and their UUID. The lsblk command in Linux listing all drives connected and respective UUIDs I also utilise the “df -h” command to see disks mounted, space available and mounted locations. An email of how I configured /etc/fstab is also below as for one of my drives it was an NTFS partition. Here’s how I sorted it on Debian. Install ntfs-3g with “sudo apt-get install ntfs-3g” – As I found this package didn’t come with Debian 10. After you’ve determine the drive with df or lsblk – Create the directory where you would like to mount the drive. Finally, the /etc/fstab will need the line as per below – with your UUID of course. /etc/fstab example – With an NTFS Filesystem.]]></summary></entry><entry><title type="html">Setting up Samba on Debian</title><link href="https://docs.autechnet.com/2020/10/18/setting-up-samba-on-debian/" rel="alternate" type="text/html" title="Setting up Samba on Debian" /><published>2020-10-18T06:44:09+10:00</published><updated>2020-10-18T06:44:09+10:00</updated><id>https://docs.autechnet.com/2020/10/18/setting-up-samba-on-debian</id><content type="html" xml:base="https://docs.autechnet.com/2020/10/18/setting-up-samba-on-debian/"><![CDATA[<div class="post-thumb"><img alt="" class="attachment-post-thumbnail size-post-thumbnail wp-post-image" height="1050" src="/assets/uploads/2020/05/image-1.png" width="1916"/></div><br/>
<p>Recently I’ve moved from utilising a Synology NAS for network storage to an old business class HP Desktop that’s been fitted out with some extra storage. I’ve installed Debian with no GUI to save on resources and presently using just 300MB of RAM while already running – TFTP, Samba and Apache. </p>
<p>Below are the guides followed that assisted in configuring a Debian system. </p>
<ul class="wp-block-list"><li>Linuxize – <a href="https://linuxize.com/post/how-to-install-and-configure-samba-on-ubuntu-18-04/" rel="noreferrer noopener" target="_blank">How to install and configure Samba on Ubuntu</a>.</li><li>Linux Config – <a href="https://linuxconfig.org/how-to-configure-samba-server-share-on-debian-9-stretch-linux" rel="noreferrer noopener" target="_blank">How to configure Samba Share on Debian 9</a>.</li></ul>]]></content><author><name></name></author><category term="General" /><summary type="html"><![CDATA[Recently I’ve moved from utilising a Synology NAS for network storage to an old business class HP Desktop that’s been fitted out with some extra storage. I’ve installed Debian with no GUI to save on resources and presently using just 300MB of RAM while already running – TFTP, Samba and Apache. Below are the guides followed that assisted in configuring a Debian system. Linuxize – How to install and configure Samba on Ubuntu.Linux Config – How to configure Samba Share on Debian 9.]]></summary></entry><entry><title type="html">Ubuntu and Slax PXE Booting</title><link href="https://docs.autechnet.com/2020/09/08/ubuntu-and-slax-pxe-booting/" rel="alternate" type="text/html" title="Ubuntu and Slax PXE Booting" /><published>2020-09-08T06:05:17+10:00</published><updated>2020-09-08T06:05:17+10:00</updated><id>https://docs.autechnet.com/2020/09/08/ubuntu-and-slax-pxe-booting</id><content type="html" xml:base="https://docs.autechnet.com/2020/09/08/ubuntu-and-slax-pxe-booting/"><![CDATA[<p>After much research and reading deep into how PXE worked on Linux I found the following two articles aided in allowing the configuration of PXE Booting on my network.</p>
<p> A final write-up to come after a second run down of a creating a PXE Server. </p>
<ul class="wp-block-list"><li>Configuring PXE Network Server on Ubuntu 18.04 LTS – <a href="https://linuxhint.com/pxe_boot_ubuntu_server/" rel="noreferrer noopener" target="_blank">Link</a>.</li><li>How to install UEFI Ubuntu Client through PXE Infrastructure – <a href="http://c-nergy.be/blog/?p=13191" rel="noreferrer noopener" target="_blank">Part I</a>, <a href="https://c-nergy.be/blog/?p=13334" rel="noreferrer noopener" target="_blank">Part III</a>. </li></ul>]]></content><author><name></name></author><category term="General" /><summary type="html"><![CDATA[After much research and reading deep into how PXE worked on Linux I found the following two articles aided in allowing the configuration of PXE Booting on my network. A final write-up to come after a second run down of a creating a PXE Server. Configuring PXE Network Server on Ubuntu 18.04 LTS – Link.How to install UEFI Ubuntu Client through PXE Infrastructure – Part I, Part III.]]></summary></entry><entry><title type="html">Headless Ubuntu VNC Server</title><link href="https://docs.autechnet.com/2020/05/20/headless-ubuntu-vnc-server/" rel="alternate" type="text/html" title="Headless Ubuntu VNC Server" /><published>2020-05-20T18:35:03+10:00</published><updated>2020-05-20T18:35:03+10:00</updated><id>https://docs.autechnet.com/2020/05/20/headless-ubuntu-vnc-server</id><content type="html" xml:base="https://docs.autechnet.com/2020/05/20/headless-ubuntu-vnc-server/"><![CDATA[<p>TechOverflow.net has a great guide on getting this done. </p>
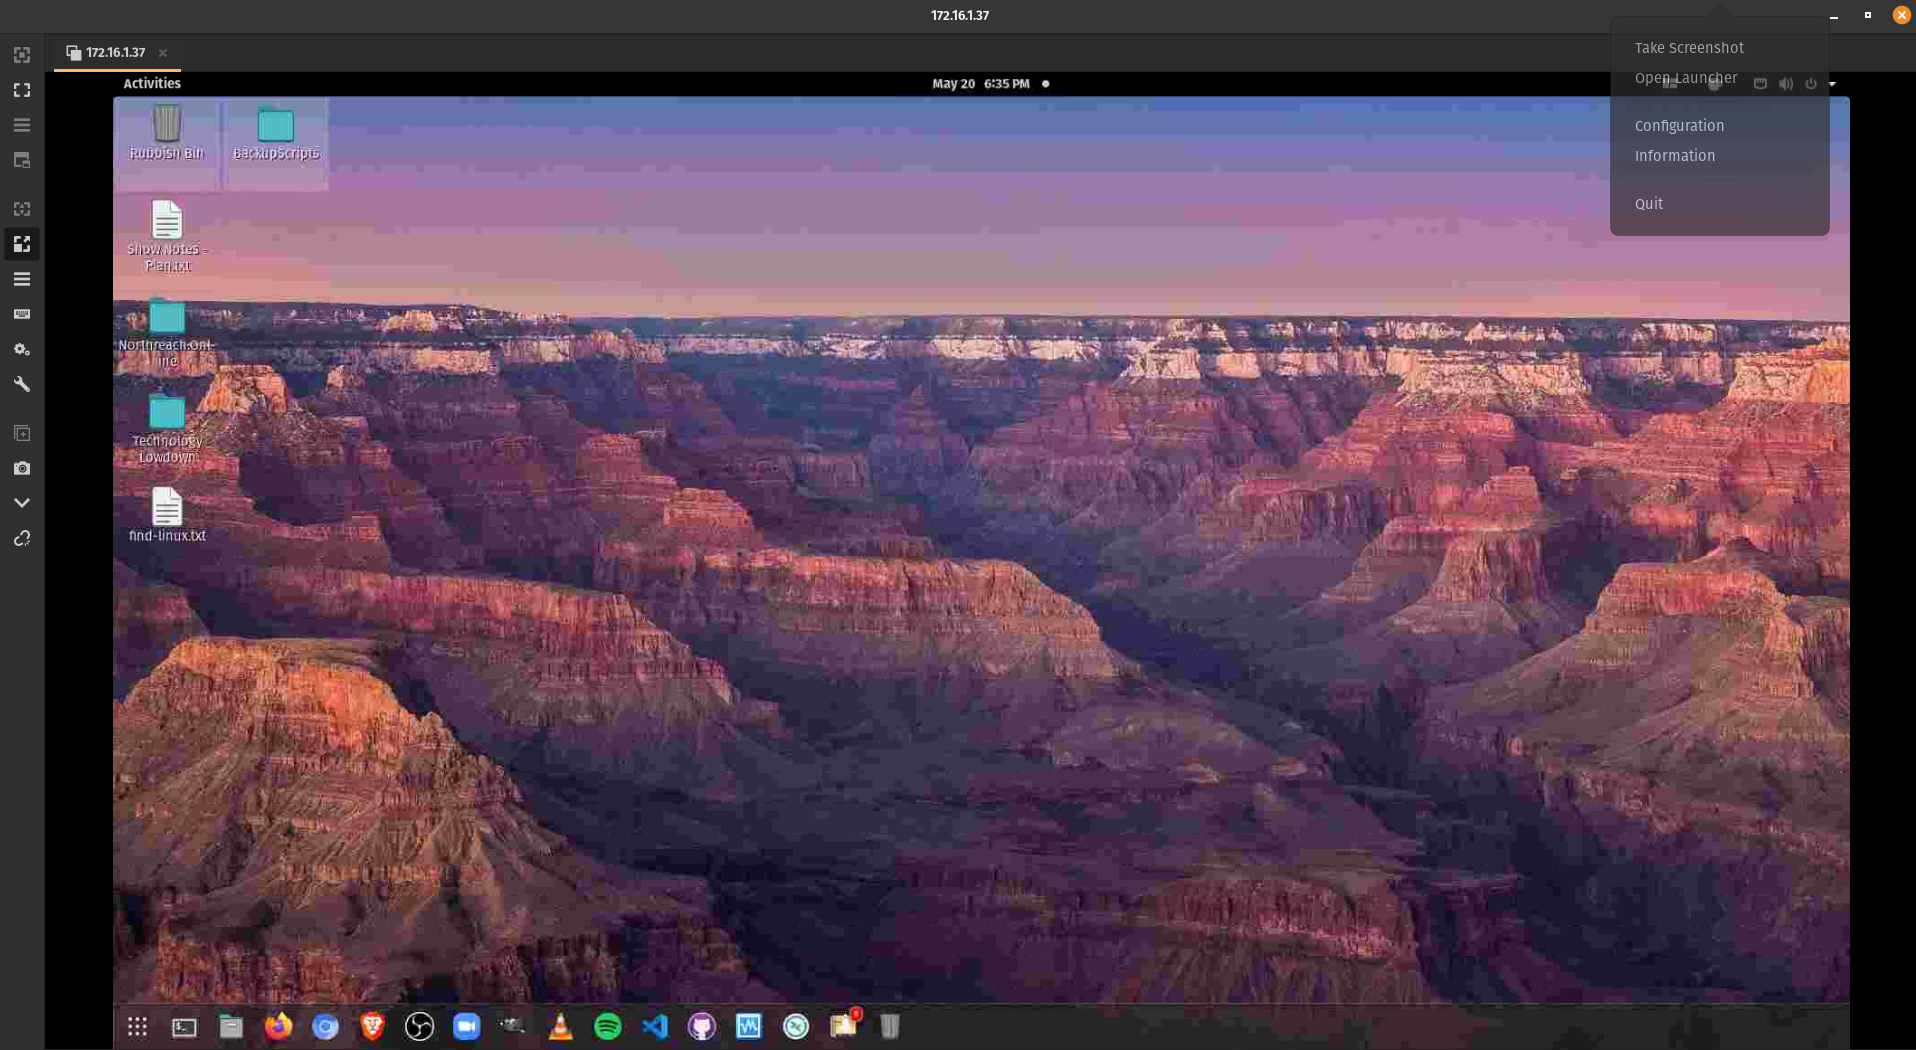
<p>Install – xserver-xorg-video-dummy</p>
<pre class="wp-block-code"><code>sudo apt-get install xserver-xorg-video-dummy</code></pre>
<p>The guide at AskUbuntu does work but only seems to support a 1028×800 resolution – <a class="aioseop-link" href="https://askubuntu.com/questions/453109/add-fake-display-when-no-monitor-is-plugged-in">AskUbuntu.com</a>.</p>
<p>Then, update or create /etc/X11/10-xorg-dummy.conf (Can really be called anything you like) </p>
<p>If you want a higher resolution the following .conf at <a class="aioseop-link" href="https://techoverflow.net/2019/02/23/how-to-run-x-server-using-xserver-xorg-video-dummy-driver-on-ubuntu/">techoverflow.net</a> should work. If the tech-overflow.net link is no longer valid a copy of the conf file needed is available here – <a class="aioseop-link" href="https://pastebin.com/DN1LSkgY">PasteBin</a>. </p>
<figure class="wp-block-image size-large"><img alt="" class="wp-image-200" height="1050" src="/assets/uploads/2020/05/image-1.png" width="1916"/></figure>]]></content><author><name></name></author><category term="General" /><summary type="html"><![CDATA[TechOverflow.net has a great guide on getting this done. Install – xserver-xorg-video-dummy sudo apt-get install xserver-xorg-video-dummy The guide at AskUbuntu does work but only seems to support a 1028×800 resolution – AskUbuntu.com. Then, update or create /etc/X11/10-xorg-dummy.conf (Can really be called anything you like) If you want a higher resolution the following .conf at techoverflow.net should work. If the tech-overflow.net link is no longer valid a copy of the conf file needed is available here – PasteBin.]]></summary></entry><entry><title type="html">Get-PSDrive Used, Free and Total Capacity</title><link href="https://docs.autechnet.com/2020/05/19/get-psdrive-used-free-and-capacity/" rel="alternate" type="text/html" title="Get-PSDrive Used, Free and Total Capacity" /><published>2020-05-19T11:28:29+10:00</published><updated>2020-05-19T11:28:29+10:00</updated><id>https://docs.autechnet.com/2020/05/19/get-psdrive-used-free-and-capacity</id><content type="html" xml:base="https://docs.autechnet.com/2020/05/19/get-psdrive-used-free-and-capacity/"><![CDATA[<p>Run the following in Power Shell to get a list of the used, free and total disk capacity on the Windows system. </p>
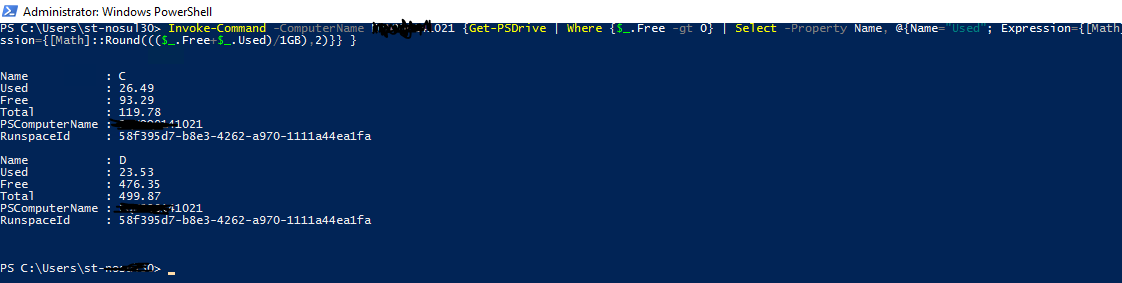
<p>Invoke-Command -ComputerName ComputerName {Get-PSDrive | Where {$_.Free -gt 0} | Select -Property Name, @{Name=”Used”; Expression={[Math]::Round(($_.Used/1GB),2)}}, @{Name=”Free”; Expression={[Math]::Round(($_.Free/1GB),2)}}, @{Name=”Total”; Expression={[Math]::Round((($_.Free+$_.Used)/1GB),2)}} }</p>
<figure class="wp-block-image size-large"><img alt="" class="wp-image-195" height="283" src="/assets/uploads/2020/05/image.png" width="1122"/></figure>]]></content><author><name></name></author><category term="Powershell" /><summary type="html"><![CDATA[Run the following in Power Shell to get a list of the used, free and total disk capacity on the Windows system. Invoke-Command -ComputerName ComputerName {Get-PSDrive | Where {$_.Free -gt 0} | Select -Property Name, @{Name=”Used”; Expression={[Math]::Round(($_.Used/1GB),2)}}, @{Name=”Free”; Expression={[Math]::Round(($_.Free/1GB),2)}}, @{Name=”Total”; Expression={[Math]::Round((($_.Free+$_.Used)/1GB),2)}} }]]></summary></entry><entry><title type="html">Assign Existing User to MySQL Database in PHPMyAdmin</title><link href="https://docs.autechnet.com/2020/04/30/assign-existing-user-to-mysql-database-in-phpmyadmin/" rel="alternate" type="text/html" title="Assign Existing User to MySQL Database in PHPMyAdmin" /><published>2020-04-30T21:37:01+10:00</published><updated>2020-04-30T21:37:01+10:00</updated><id>https://docs.autechnet.com/2020/04/30/assign-existing-user-to-mysql-database-in-phpmyadmin</id><content type="html" xml:base="https://docs.autechnet.com/2020/04/30/assign-existing-user-to-mysql-database-in-phpmyadmin/"><![CDATA[<p>Stackoverflow lists a great example that can be done by simply using the Console feature of PHPMyAdmin.</p>
<figure class="wp-block-embed"><div class="wp-block-embed__wrapper">
https://stackoverflow.com/questions/22199557/assign-an-existing-user-to-mysql-databases
</div></figure>
<p>Use the grant permissions command.</p>
<p>If your database was call “newDatabase” and your user was name “newUser” the command to grant all privileges on all the tables contained within would be:</p>
<pre class="wp-block-code"><code>GRANT ALL PRIVILEGES ON `newDatabase`.* TO 'newUser'@'localhost';</code></pre>
<p>This would restrict the user from access the database only from the localhost, to enable access from all host change localhost to ‘%’</p>
<p>You then need to refresh the privileges with the following command:</p>
<pre class="wp-block-code"><code>FLUSH PRIVILEGES;</code></pre>
<p>EDIT:</p>
<p>To grant privileges to every database on the mysql server use the following command (notice the *.*):</p>
<pre class="wp-block-code"><code>GRANT ALL PRIVILEGES ON *.* TO 'newUser'@'localhost';</code></pre>]]></content><author><name></name></author><category term="MySQL" /><summary type="html"><![CDATA[Stackoverflow lists a great example that can be done by simply using the Console feature of PHPMyAdmin. https://stackoverflow.com/questions/22199557/assign-an-existing-user-to-mysql-databases Use the grant permissions command. If your database was call “newDatabase” and your user was name “newUser” the command to grant all privileges on all the tables contained within would be: GRANT ALL PRIVILEGES ON `newDatabase`.* TO 'newUser'@'localhost'; This would restrict the user from access the database only from the localhost, to enable access from all host change localhost to ‘%’ You then need to refresh the privileges with the following command: FLUSH PRIVILEGES; EDIT: To grant privileges to every database on the mysql server use the following command (notice the *.*): GRANT ALL PRIVILEGES ON *.* TO 'newUser'@'localhost';]]></summary></entry></feed>